Recording & Triggering
Manual Recording
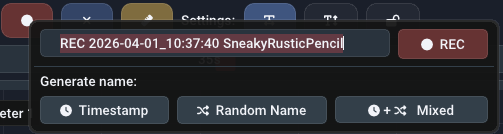
Click Record to start a recording. Right Button or Shift+Left Button the button to set a custom filename before starting.
Only visible channels are recorded
Channels that are disabled will not be recorded even if the device is connected.
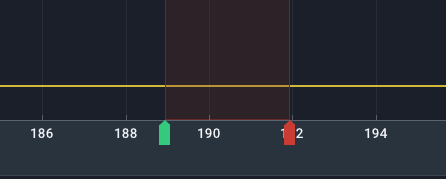
Green START and red STOP markers appear in the plot timeline, and a new entry is added to the recordings panel.

Right-click the Record button to open the naming dialog, where you can type a name manually, generate one from the current date, or use a random identifier.
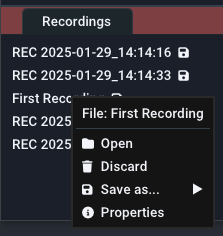
Double-click a recording entry to open it as a File: tab in the live graph panel. The icon means the file has not been saved to disk yet. Right-click the entry to save, rename, or delete it.
Recordings are not auto-saved
Recordings stay in RAM until exported to a re-importable filetype. Newer EasyGraph versions include auto-backup to protect against unexpected program closes.
Trigger-based Recording
The trigger automatically starts and stops recordings when a configured condition is met. Right-click the Trigger button to open the trigger menu.
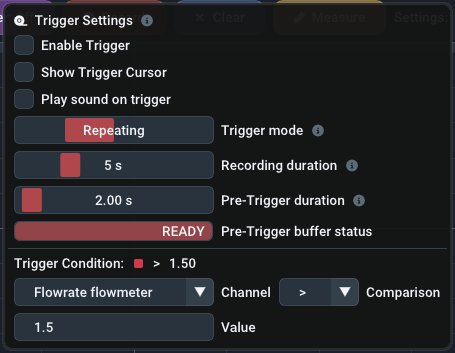
Configure all options before enabling the trigger via Enable Trigger or by clicking the violet Trigger button with Left Button.
Trigger Modes
EasyGraph supports one trigger definition at a time. Select the mode that fits your use case:
| Mode | Behavior |
|---|---|
| OneShot | Fires once, then disables itself. |
| Repeating | Re-fires each time the condition goes false, then true again. |
| Continuous | Re-fires immediately if the condition is still true when the recording ends. |
| Hold | Records while the condition is true. After it goes false, recording continues for the configured hold duration. If the condition becomes true again within that window, the countdown resets. Useful for processes with brief intermittent drops where you want one continuous recording instead of many fragments. |
Trigger Condition
The trigger fires when the live value of the selected channel satisfies the configured condition:
| Operator | Description |
|---|---|
= |
equal to |
!= |
not equal to |
> |
greater than |
>= |
greater or equal to |
< |
less than |
<= |
less or equal to |
Enter the threshold in the input field, or drag the Trigger line directly in the live graph panel.
Adjust the threshold visually without activating the trigger
Enable Show Trigger Cursor to display the cursor line without starting the trigger. Drag it to the desired level. The cursor color matches the selected channel.

Other Settings
Recording duration — (Not in Hold mode) Total recording length = recording duration + pre-trigger duration. Adjust with the slider.
Enter an exact duration
Hold Ctrl and click the slider to type a value in seconds. Confirm with Enter, discard with Esc.
Pre-trigger duration — Captures data from before the trigger fired. After enabling the trigger, a ring buffer fills with recent samples. Recording is ready once the buffer is full.
Hold duration — (Hold mode only) How long recording continues after the condition goes false. The countdown resets if the condition becomes true again within this window.
Notification sound — Enable Play sound on trigger to play an audio cue when the trigger starts or stops a recording.